
Please enter the e-mail address provided during registration.
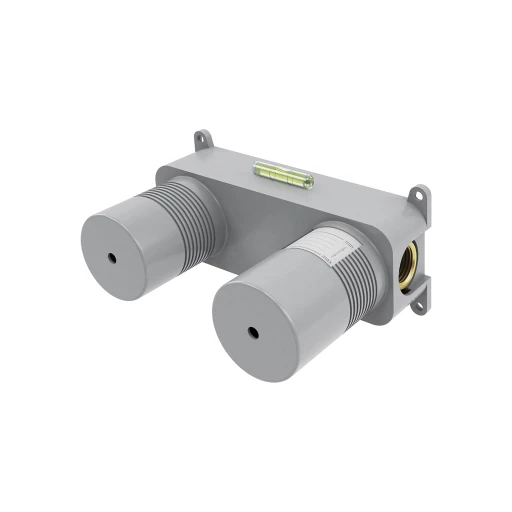
BOX | built-in part for basin mixer for concealed installation
The built-in element is equipped with a brass body and a high-quality ceramic cartridge. Its advantages include easy installation and a minimal installation depth of only 5.2 cm. The BOX is intended to be combined with the following exposed parts: Y1215HROGR, Y1215HRONI, Y1215HROCPB, Y1215HROCP, Y1215HROWM, Y1215HROCR, Y1215HROGL, Y1215HROGLB, Y1215HROBSB, Y1215HROBL, Y1215HLROWM, Y1215HLROBL, Y1215HLROCR, Y1215HLROGL, Y1215HLROGLB, Y1215HLROBSB, Y1215HLRONI, Y1215HLROCP, Y1215HLROCPB, Y1215HLROGR.

The mixer is equipped with the highest quality ceramic cartridge which ensures smooth and precise water flow control whilst guaranteeing long term product performance.

The product has a 5-year warranty. Details of warranty terms.
You should clean your bathroom and kitchen fittings regularly, preferably after each use, so as to prevent the build-up of hard-to-remove dirt. For daily maintenance of external surfaces, use a soft cloth (for example, a microfibre cloth) and a solution of water with a mild cleaning agent with a natural composition, then rinse the product thoroughly with clean water and wipe it dry. It is not recommended to use rough or abrasive materials and corrosive or bleaching substances to prevent damaging the surface of the product.
For more stubborn dirt, use a 10% citric acid solution with water. Apply this solution directly to the product or cover the product with a cloth soaked in the solution. After 10 minutes, rinse the product thoroughly with clean water and wipe it dry. If necessary, the process can be repeated.

Remember to regularly control the flow of water through the aerator so as to ensure its problem-free operation and protect it from damage. In the case of small contaminants in the water or “hard” water, remove the aerator once every few weeks and clean it with a brush. In the case of more stubborn dirt, we recommend soaking the aerator for 10 minutes in a 10% citric acid solution with water.

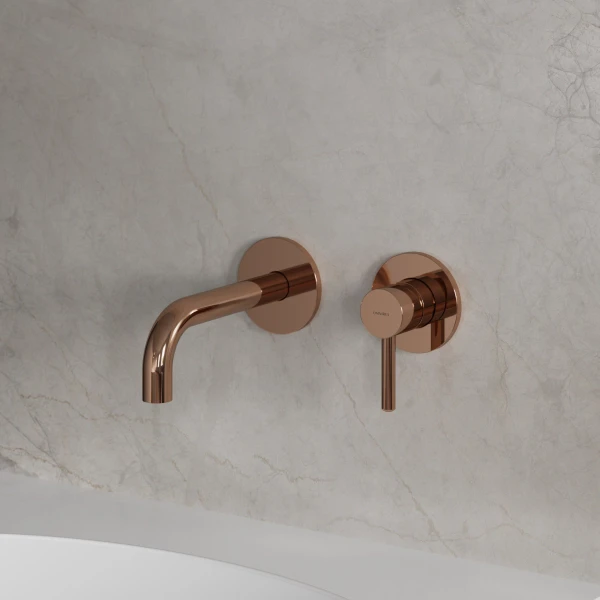
BOX | built-in part for basin mixer for concealed installation
The built-in element is equipped with a brass body and a high-quality ceramic cartridge. Its advantages include easy installation and a minimal installation depth of only 5.2 cm. The BOX is intended to be combined with the following exposed parts: Y1215HROGR, Y1215HRONI, Y1215HROCPB, Y1215HROCP, Y1215HROWM, Y1215HROCR, Y1215HROGL, Y1215HROGLB, Y1215HROBSB, Y1215HROBL, Y1215HLROWM, Y1215HLROBL, Y1215HLROCR, Y1215HLROGL, Y1215HLROGLB, Y1215HLROBSB, Y1215HLRONI, Y1215HLROCP, Y1215HLROCPB, Y1215HLROGR.
The mixer is equipped with the highest quality ceramic cartridge which ensures smooth and precise water flow control whilst guaranteeing long term product performance.
The product has a 5-year warranty. Details of warranty terms.
The mixer is equipped with the highest quality ceramic cartridge which ensures smooth and precise water flow control whilst guaranteeing long term product performance.
The product has a 5-year warranty. Details of warranty terms.
You should clean your bathroom and kitchen fittings regularly, preferably after each use, so as to prevent the build-up of hard-to-remove dirt. For daily maintenance of external surfaces, use a soft cloth (for example, a microfibre cloth) and a solution of water with a mild cleaning agent with a natural composition, then rinse the product thoroughly with clean water and wipe it dry. It is not recommended to use rough or abrasive materials and corrosive or bleaching substances to prevent damaging the surface of the product.
For more stubborn dirt, use a 10% citric acid solution with water. Apply this solution directly to the product or cover the product with a cloth soaked in the solution. After 10 minutes, rinse the product thoroughly with clean water and wipe it dry. If necessary, the process can be repeated.
Remember to regularly control the flow of water through the aerator so as to ensure its problem-free operation and protect it from damage. In the case of small contaminants in the water or “hard” water, remove the aerator once every few weeks and clean it with a brush. In the case of more stubborn dirt, we recommend soaking the aerator for 10 minutes in a 10% citric acid solution with water.
